👉 Let’s stay connected on social media!

Pizza Grilled Cheese

!
QUICK REMINDER:
While we have provided a jump to recipe button, please note that if you scroll straight to the recipe card, you may miss helpful details about ingredients, step-by-step tips, answers to common questions and helpful guidance to improve your results.
Pizza Grilled Cheese is my new GO-TO comfort hack, and yes, Pizza Grilled Cheese is in the very first sentence because it deserves it!!! This Pizza Grilled Cheese is melty, quick, and ridiculously satisfying — perfect for weeknight dinners, lunchboxes, or that late-night snack you swear will be just one bite (ha!). It’s cheesy, tomato-y, crunchy on the outside, gooey inside, and SO easy to make. You can do this! If you want a sweet finish after your sandwich (because why not?), try a light dessert like my creamy no-bake cheesecake with berries — it’s a perfect match and I always say balance is everything!
I found this in a late-night kitchen experiment years ago, after teaching all day and needing SOMETHING fast, and it stuck. Quick benefit list? Ready in minutes, uses pantry basics, utterly kid-approved, great for meal prep, and totally customizable — because YOU make it yours, truly yours, your way!!!
Why You’ll Fall Head Over Heels
This sandwich is mania in the best way — melty cheese, tangy sauce, crisp buttery bread, and peppery toppings (or veggies!) all wrapped up into one handheld happy thing. It’s comfort, but smarter — protein from cheese, tomatoes that have lycopene, bread for energy—simple stuff, wholesome-ish, and filling. Busy family? Yes. Meal preppers? Absolutely. Pinterest hunters, recipe collectors, snack attackers — all welcome, all delighted. It’s forgiving, so if your bread browns a tad too fast, no big deal, flip it, recover, still incredible. Delicious, delicious, delicious — it’s so, so good, I say it twice because I mean it!!!!
Ingredients You Need (And Some Fun Swaps)
- 2 slices of bread
- 2 slices of cheese (mozzarella or cheddar)
- 1/4 cup pizza sauce
- 1/4 cup turkey pepperoni slices or your choice of pizza toppings (e.g., bell peppers, olives, onions, mushrooms)
- Butter (for grilling)
Spotlight: I love using a good-quality low-moisture mozzarella for max stretch, or a sharp cheddar for big flavor — both are winners, honestly. Prefer no-meat? Use vegetarian pepperoni or extra veggies; both are tasty and keep it lighter. Health note: add extra veggies to boost fiber and vitamins (easy!). I buy my basics at the local co-op and the cheese on sale at the farmer’s market (savvy shopping tip!), but you can absolutely use whatever’s in the fridge to keep costs low. Cost-conscious tip: buy store-brand bread and block cheese, shred it yourself — big savings. Experiment! Swap in whole-grain bread, use a pesto base, toss on fresh basil — make it yours, try it, repeat.

Quick Step-by-Step (The Easy Process)
- Preheat a skillet over medium heat. Give it a couple minutes so it’s evenly warm — that first sizzle matters. Don’t worry if your pan isn’t perfectly non-stick; you’ll be fine.
- Butter one side of each slice of bread. Be generous if you like crisp edges, lighter if you prefer softer crusts — either way is great.
- Place one slice of bread, buttered side down, in the skillet. Hear that sizzle? Love that sound. Wait 30–60 seconds to set.
- Spread pizza sauce on the bread, layer the cheese, and add your pizza toppings. Cheese first if you want extra melty fusion, sauce first if you like saucier bites — your choice. Don’t overload or the sandwich won’t cook evenly.
- Top with the second slice of bread, buttered side up. Press gently so everything meets and hugs.
- Cook until the bottom is golden brown, then flip and cook the other side. About 2–3 minutes per side, watch for golden brown, adjust heat if needed. If cheese isn’t melting, cover briefly with a lid for 30–60 seconds. Then, and then again, flip once more if you must — it’s fine.
- Once the cheese is melted and both sides are golden, remove from the skillet, slice, and serve hot. Slice diagonally to show the cheesy pull — pure joy. Don’t worry about mess, embrace it!!!
Smart Tips & Tricks From My Kitchen
Keep the heat moderate so the cheese melts before the bread burns — this is the #1 trick, promise. Make-ahead? Assemble sandwiches, wrap in plastic, refrigerate up to 24 hours, then grill from chilled (add a minute per side). Storage: cooled sandwiches in the fridge for up to 3 days, reheat in a skillet or toaster oven to keep crispness (microwave makes soggy results — we avoid soggy!). Batch cooking: make a bunch, slice and freeze individually wrapped for quick lunches. Kid-friendly twist: cut into fun shapes, swap turkey pepperoni for ham-free options, and pack sauce on the side for dipping — they LOVE dipping. Teacher-voice: label containers, date them, rotate stock — you can do this!
How to Serve and Pair It
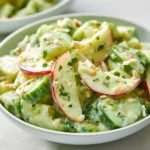
Serve with a crisp green salad, a pile of carrot sticks, or a bowl of tomato soup for dunking — all classics, all winners. For casual parties, cut into small squares and offer assorted toppings so everyone customizes, which is sooo fun. I often pair mine with simple roasted veggies or even a light pasta salad when feeding a crowd (because easy!). Leftovers? Chop and toss into an omelet or salad for a second life, because leftovers can be brilliant. Feeling indulgent? Finish with a tiny sweet bite — like the moist red velvet cupcakes with cream cheese frosting — perfect little celebration! Try it, please try it, you’ll love it.
Frequently Asked Questions
Yes, absolutely — use your favorite gluten-free loaf and treat it the same way; time may vary slightly but it works great.
Low-moisture mozzarella gives the classic stretch, but mixing mozzarella with cheddar brings flavor and melt — both wonderful, go wild.
Yes! Use vegan cheese, vegan pepperoni or roasted veggies, and vegan butter or olive oil for grilling; still delicious and still comforting, trust me.
Don’t overload with sauce, grill on medium heat so the exterior crisps, and press gently; also pre-toast the bread a touch if you want extra protection against sogginess.
Yes — fully cool, wrap tightly, freeze up to 1 month; reheat from frozen in a skillet with a lid on low heat so the cheese melts without burning the bread.
This sandwich is EASY and ridiculous and very delicious, I promise you’ll make it again, again, again. Questions? Comments? Send pics, tag me on socials, I want to see your melty pulls and your funny kitchen experiments — seriously, show me!!! You can do this — make it, tweak it, love it — and tell me how it went?
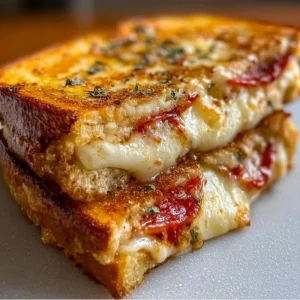
Pizza Grilled Cheese
A melty, quick, and satisfying grilled cheese sandwich filled with cheesy goodness and pizza toppings, perfect for any meal.
Ingredients
Main Ingredients
- 2 slices slices of bread Use whole-grain or your choice of bread.
- 2 slices slices of cheese (mozzarella or cheddar) Low-moisture mozzarella is preferred for stretch.
- 1/4 cup pizza sauce Choose your favorite brand or homemade sauce.
- 1/4 cup turkey pepperoni slices or your choice of pizza toppings Substitute with bell peppers, olives, onions, or mushrooms.
- Butter For grilling.
Instructions
Preparation
- Preheat a skillet over medium heat. Let it warm up for a couple of minutes.
- Butter one side of each slice of bread, adjusting the amount based on preference for crispiness.
- Place one slice of bread, buttered side down, in the skillet and wait 30–60 seconds until it sets.
- Spread pizza sauce on the bread, layer on cheese, and add your choice of toppings.
- Top with the second slice of bread, buttered side up, and press gently.
- Cook until the bottom is golden brown, then flip and cook the other side for 2–3 minutes.
- If the cheese isn't melting, cover the skillet with a lid briefly.
- Once both sides are golden and the cheese is melted, remove from skillet, slice, and serve hot.
Notes
Keep the heat moderate to ensure the cheese melts well without burning the bread. For make-ahead, assemble up to 24 hours in advance.