👉 Let’s stay connected on social media!

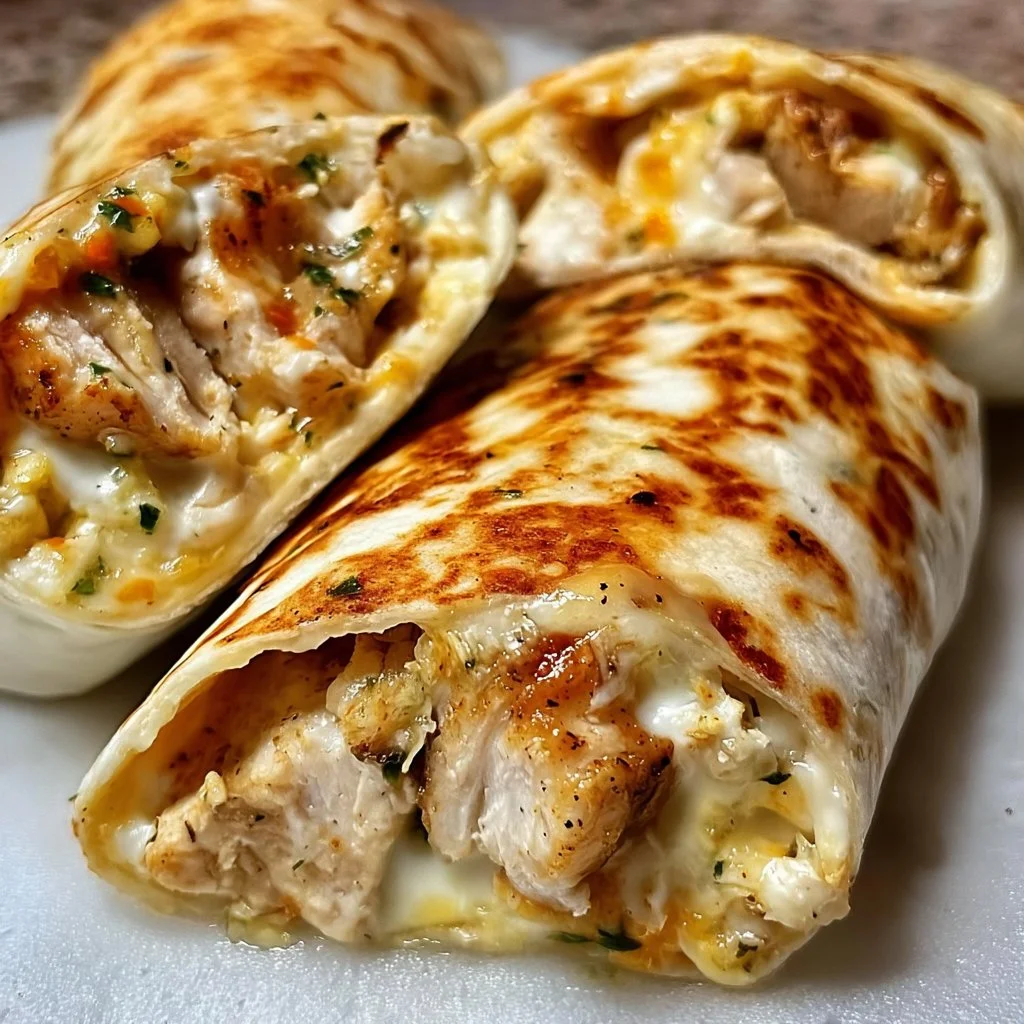
Ooey-Gooey Cheesy Garlic Chicken Wraps

!
QUICK REMINDER:
While we have provided a jump to recipe button, please note that if you scroll straight to the recipe card, you may miss helpful details about ingredients, step-by-step tips, answers to common questions and helpful guidance to improve your results.
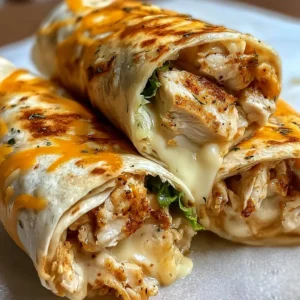
Ooey-Gooey Cheesy Garlic Chicken Wraps are your new weeknight hero… and I’m not exaggerating even a little. These cheesy garlic chicken wraps are melty, toasty, ridiculously comforting, and still totally doable on a busy Tuesday night. We’re talking shredded chicken, sizzling garlic, bubbly cheese, soft tortillas, and a quick skillet toast that turns everything into that magical ooey-gooey situation.
I first threw these together on one of those “everyone is starving and I forgot to defrost anything” nights in Austin, and honestly, I wasn’t expecting much. But my family took one bite and just stared at me like, “Uh… why is this so GOOD?” And then we made them again. And again. And again. These wraps are fast, they’re customizable, they’re meal-prep friendly, and they feel a little bit like ordering takeout… without actually ordering takeout.
You get protein from the chicken, that cheesy comfort-factor, those colorful veggies so you feel like an adult, and enough garlic to make the whole kitchen smell like a cozy little café. Plus: one pan, minimal dishes, big payoff. You can absolutely do this. You really, really can.
Why These Cheesy Garlic Wraps Are Going To Be Your New Obsession
These Ooey-Gooey Cheesy Garlic Chicken Wraps hit SO many happy buttons at once that it almost feels unfair. They’re fast, which matters when you’re juggling work, kids, or just life and your brain is done by 5 p.m. They’re incredibly comforting, like cheesy garlic bread met your favorite chicken quesadilla and they decided to be best friends forever. And they’re flexible, meaning you can swap veggies, change the cheese, use leftover rotisserie chicken, and it still turns out insanely good.
If you’re cooking for picky kids, these wraps are a lifesaver because the flavors are familiar and friendly, and you can sneak in some finely chopped veggies without any drama. If you’re watching carbs or calories, you can use whole wheat or low-carb tortillas, lean chicken breast, and a lighter sprinkle of cheese, and you still get that big flavor payoff. If you’re meal prepping, they reheat like a dream and pack beautifully for lunches. They’re honestly so forgiving, they basically refuse to fail, and that’s why I make them over and over and over again. They’re that good. Really that good.
Ingredients You’ll Need (And How To Make Them Work For You)
- 1 lb cooked chicken, shredded
- 1 cup shredded cheese (cheddar or mozzarella)
- 3 cloves garlic, minced
- 4 large tortillas or wraps
- 1 cup mixed vegetables (bell peppers, onions, etc.)
- Salt and pepper to taste
- Olive oil for cooking
Let’s talk about what makes this combo special. Shredded chicken is your best friend here—rotisserie chicken from the grocery store is perfect, or leftover grilled or baked chicken from last night. I grab a rotisserie bird from H‑E‑B or Costco in Austin all the time and shred it for this; it’s cheaper than buying takeout, and it stretches into multiple meals.
For the cheese, cheddar gives you that bold, sharp flavor, while mozzarella gives you maximum stretch and gooeyness. Use what you love or mix them for the best of both worlds. If you want to lighten things up a bit, you can use a reduced-fat cheese or just sprinkle a little less.
Garlic is the heart of the flavor—fresh minced garlic really does make a difference. If peeling garlic on a weeknight sounds like too much, use the pre-minced jarred garlic. It’s okay. We’re about making this doable, not perfect. Mixed veggies can be whatever is lounging in your fridge: bell peppers, onions, a little spinach, even some leftover roasted veggies. Frozen peppers and onions work great too and are super budget-friendly.
Use whatever tortillas you like: regular flour, whole wheat, low-carb, or even high-protein wraps if that’s your thing. The olive oil helps everything crisp up in the pan, giving that golden, slightly crunchy outside that contrasts with the melty inside. Play with it. Make swaps. These wraps are very “go with the flow,” which I LOVE.
How To Make Them: Step-By-Step, Without Freaking Out
-
In a skillet over medium heat, add a little olive oil and sauté the minced garlic until fragrant.
Take your time here—about 30–60 seconds is enough. You want the garlic soft and fragrant, not brown and bitter. If it starts to brown too fast, just pull the pan off the heat for a second. Don’t worry, you didn’t ruin it! -
Add the shredded chicken and mixed vegetables, seasoning with salt and pepper. Cook until heated through.
This usually takes about 4–6 minutes. Stir occasionally so nothing sticks. The veggies should soften a bit, and the chicken should be hot and well-coated in that garlicky goodness. If it looks a little dry, drizzle in a tiny bit more olive oil or even a splash of chicken broth. -
Lay out the tortillas and evenly distribute the chicken mixture on each.
Turn off the heat for a minute and move over to your counter. Divide the filling between the four tortillas, keeping it in a line down the center. If your tortillas are stiff, you can warm them in the microwave for 10–15 seconds to make rolling easier. -
Sprinkle shredded cheese over the top.
This is the moment where you decide how “ooey-gooey” you want them. A light sprinkle for a slightly lighter wrap, or a generous handful for that full cheese-pull situation. You seriously can’t mess this up. -
Roll up each tortilla tightly to form a wrap.
Fold in the sides first, then roll up from the bottom like a burrito. If a little filling falls out, just tuck it back in—this is home cooking, not a restaurant photo shoot. You’re doing amazing. -
Wipe the skillet clean and return to medium heat.
A quick wipe with a paper towel is plenty. This keeps any leftover bits from burning and makes your wraps toast evenly. -
Place the wraps seam-side down in the skillet and cook until golden brown and crispy on both sides, about 2-3 minutes per side.
This is when the magic happens. Press them down gently with a spatula so they make good contact with the pan. When the first side is golden and the cheese is starting to melt, flip and do the other side. If they’re browning too fast, drop the heat a little. You’re looking for crispy, not charred. -
Remove from heat, slice in half, and serve warm.
Let them sit for 1–2 minutes so you don’t burn your mouth on the cheese (ask me how I know). Then slice diagonally for that café-style look. The cheese will be melty, the inside tender, the outside crisp. It’s just SO good.
Little Tricks To Make This Recipe Work Even Harder For You
You can absolutely make the chicken-veggie filling ahead of time—up to 3 days—and keep it in the fridge. Then all you have to do on a busy night is stuff, roll, toast, done. These wraps are perfect for batch cooking too: assemble a whole tray, wrap them individually, and refrigerate or freeze before toasting. For freezing, I like to wrap each one in foil; then I just thaw overnight in the fridge and crisp them in the skillet when I need them.
Leftovers reheat beautifully in a skillet or air fryer at 350°F for a few minutes to bring back that crunch. The microwave works too, but you’ll lose some crispness (still delicious, just softer). For kids, you can tone down the garlic slightly, chop the veggies very small, and maybe serve with a fun dip like ranch or marinara—suddenly it’s like “cheesy chicken dippers” and everyone’s happy. Remember, there is NO perfect way to do this. There’s just the way that keeps you sane and fed, and that absolutely counts.
How To Serve Your Wraps (And Make Them Feel Extra Special)
These Ooey-Gooey Cheesy Garlic Chicken Wraps are basically a full meal in your hand, but a few simple sides make them feel restaurant-worthy. I love serving them with a bright green salad, a simple slaw, or even just sliced cucumbers and cherry tomatoes for that fresh crunch. On game days, I’ll cut them into smaller pieces and serve as finger food with salsa, Greek yogurt, or a garlicky yogurt dip.
They’re fantastic for lunchboxes—wrap them in foil, slice in half, and add some fruit and veggie sticks on the side. For a cozy night, I’ve paired them with tomato soup or a quick veggie soup and honestly it feels like a hug in meal form. Leftovers can be chopped up and tossed over greens like a warm cheesy chicken salad, or even stuffed into a baked potato for a very extra, very good dinner. However you serve them, just promise me you’ll actually sit for five minutes and enjoy that first bite.
Your Questions, Answered (Because I Know You’re Wondering)
You can absolutely use canned chicken in a pinch. Just drain it well, break it up with a fork, and sauté it with the garlic and veggies a little longer so it absorbs more flavor. Fresh or rotisserie chicken will have a slightly better texture, but canned totally works for those “I need food now” moments.
Use whole wheat or low-carb tortillas, go with lean chicken breast, and either reduce the cheese slightly or use a sharp cheese (you can use less but still taste it). Load up the veggies—peppers, onions, spinach, even finely chopped broccoli. You still get that cheesy, garlicky comfort, just with more nutrients and fewer extra calories. It’s a nice balance.
Yes, they freeze surprisingly well! I like to assemble the wraps but don’t toast them yet. Wrap each tightly in foil or plastic wrap, place in a freezer bag, and freeze for up to 2 months. Thaw overnight in the fridge, then toast in a skillet as directed so they crisp up fresh. You can toast from frozen too, just use low heat and give them extra time.
Totally. Swap the chicken for black beans, seasoned tofu, or even a mixture of beans and extra veggies. Just make sure you season generously with salt, pepper, and maybe a pinch of cumin or chili powder for depth. The garlic and cheese will still give you that ooey-gooey, super comforting vibe.
Mozzarella is the winner for that dramatic cheese pull, especially low-moisture, part-skim mozz. You can mix it with a little cheddar for stronger flavor and still keep that stretch. Honestly, any meltable cheese will be tasty, so use what you have and what you love.
These Ooey-Gooey Cheesy Garlic Chicken Wraps are exactly the kind of recipe I lean on again and again: simple steps, basic ingredients, and such a big, cozy payoff. They’re easy, they’re cheesy, they’re garlicky, they’re customizable, and they just WORK, over and over.
If you try them, tell me how you made them yours—what veggies you used, what cheese combo you loved, if your kids devoured them or if you meal-prepped a whole batch. Drop a comment, send a message, or tag me on social media so I can cheer you on from my little Austin kitchen. You can totally do this, and I honestly can’t wait to see your wraps…
Cheesy Garlic Chicken Wraps
These cheesy garlic chicken wraps are melty, toasty, and customizable for a comforting weeknight dinner.
Ingredients
Main Ingredients
- 1 lb cooked chicken, shredded Rotisserie chicken works great.
- 1 cup shredded cheese (cheddar or mozzarella) Mixing both cheeses is recommended for flavor and stretch.
- 3 cloves garlic, minced Fresh garlic is best, but pre-minced can be used.
- 4 large tortillas or wraps Whole wheat or low-carb tortillas can be used.
- 1 cup mixed vegetables (bell peppers, onions, etc.) Use whatever veggies you have available.
- Salt and pepper to taste
- 1 tbsp olive oil for cooking Helps crisp up the wraps.
Instructions
Sauté Garlic
- In a skillet over medium heat, add a little olive oil and sauté the minced garlic until fragrant (about 30–60 seconds).
Cook Filling
- Add the shredded chicken and mixed vegetables, seasoning with salt and pepper. Cook until heated through (4–6 minutes).
Assemble Wraps
- Lay out the tortillas and evenly distribute the chicken mixture on each.
- Sprinkle shredded cheese over the top.
- Roll up each tortilla tightly to form a wrap.
Toast Wraps
- Wipe the skillet clean and return to medium heat. Place the wraps seam-side down in the skillet and cook until golden brown and crispy on both sides (about 2-3 minutes per side).
Serve
- Remove from heat, slice in half, and serve warm.
Notes
These wraps can be assembled ahead of time and stored in the fridge for up to 3 days. They also freeze well.