👉 Let’s stay connected on social media!

Pin on food

!
QUICK REMINDER:
While we have provided a jump to recipe button, please note that if you scroll straight to the recipe card, you may miss helpful details about ingredients, step-by-step tips, answers to common questions and helpful guidance to improve your results.
If you’ve ever scrolled Pinterest at midnight searching “easy pin on food ideas” and thought, UGH I just want something fast, pretty, and delicious… this Pin on food recipe is it. This Pin on food idea is crazy simple, crazy flexible, and it looks SO cute on a board that it honestly feels a little magical. I use this Pin on food setup for busy weeknights, game days, kids’ lunches, and those last‑minute “Oh no, people are coming over” moments. It’s colorful, totally customizable, and honestly? It makes you look like you tried way harder than you did.
I stumbled on this concept years ago when I was a tired teacher trying to make snack plates for my students and my own dinner at the same time. I started layering crunchy crackers, juicy veggies, shredded chicken, cheese, and a quick yogurt dip on a big tray… snapped a picture… pinned it… and my Pinterest blew up. So we’re leaning into that today: simple components, bold flavors, and a friendly little formula you can reuse a hundred different ways.
No fuss. No weird ingredients. Just everyday food, arranged in a way that makes your brain AND your tastebuds very, very happy.
Why This “Pin On Food” Plate Deserves A Spot In Your Rotation
You know those recipes that just always work, no matter what’s going on? This is that one. It’s fast, it’s colorful, and it hits that perfect sweet spot between snack and meal, which my family absolutely loves, loves, LOVES. If you’re feeding kids, they’ll adore the “pick and choose” style. If you’re feeding adults, everyone thinks it’s one of those super intentional grazing boards. If you’re meal prepping, it packs like a dream in containers. It’s truly the ultimate little shape‑shifting recipe.
You’ll love it because it uses simple pantry staples but still feels special, because it lets you sneak in veggies and lean proteins without anyone complaining, and because you can keep it gluten‑free, dairy‑light, or higher‑protein with the easiest swaps. If your brain is tired at 5pm (same), this gives you a gentle, cozy framework instead of a strict recipe: a base, a protein, some crunch, some color, and a sauce. That’s it. And the best part? It’s almost impossible to mess up, which I know we all need, especially on THOSE days when dinner just needs to appear.
Ingredients You’ll Need (And How To Make Them Yours)
Here’s the basic version I make again and again. Think of it as a template, not a rule book—you can swap almost anything.
- Whole grain crackers or toasted pita chips
- Cooked chicken breast, shredded or diced (rotisserie is perfect)
- Hard‑boiled eggs, halved or quartered
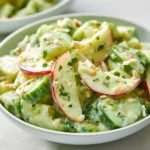
- Cherry tomatoes, whole or halved
- Cucumber, sliced into rounds or sticks
- Carrot sticks or baby carrots
- Sliced cheese (cheddar, mozzarella, or whatever you love)
- Hummus
- Greek yogurt (plain or lightly salted)
- Olive oil
- Lemon juice
- Salt & black pepper
- Garlic powder or onion powder (optional)
- Fresh herbs like parsley or cilantro (optional but so pretty)
- A handful of nuts or seeds (almonds, pistachios, sunflower seeds)
- Fresh fruit for sweetness (grapes, berries, apple slices)
Use what you’ve got: swap chicken for canned chickpeas or black beans to keep it vegetarian, or use baked tofu strips. Gluten‑free crackers totally work. Dairy‑free? Skip the cheese and use hummus plus a dairy‑free yogurt dip. I get most of these at my regular grocery store here in Austin (HEB people, I see you), but Trader Joe’s is amazing for fun crackers and hummus flavors.
For a budget‑friendly twist, make your own pita chips from leftover pita bread, use carrots and cucumbers as your main veggies, and buy block cheese to slice instead of pre‑cut. You truly cannot mess this up. Play with color, texture, and whatever’s hanging out in your fridge that needs love.
How To Pull It Together Without Overthinking It
First, set up your base. Grab a large platter, cutting board, or even a baking sheet lined with parchment. Lay out your crackers or pita chips in a loose layer—no need for perfection here. This takes about 2 minutes. If things look a little sparse, don’t worry; we’re going to fill every gap.
Next, add your protein. Scatter the shredded chicken and hard‑boiled eggs over the base like little flavor clusters. If your chicken feels dry, drizzle a tiny bit of olive oil and a pinch of salt on top. Don’t worry if it looks messy right now; once you add color, it all comes together and looks intentional, I promise.
Now bring in the color. Tuck cherry tomatoes, cucumber slices, and carrots into every empty space. I like to keep veggies in mini sections—tomatoes in one little corner, cucumbers next to the eggs, carrots near the hummus zone—but you truly can do it however your brain wants. If it looks a bit uneven at this point, just keep going; it evens out in about 5 more minutes of layering.
Time for the creamy element. Spoon hummus and Greek yogurt into small bowls or dollop them directly on the board. If you’re mixing a quick sauce, stir yogurt with a splash of lemon juice, a drizzle of olive oil, salt, pepper, and a sprinkle of garlic powder. It takes maybe 60 seconds, and it tastes like a fancy café dip.
Finish with your “little extras.” Sprinkle nuts or seeds over the top for crunch. Add small piles of sliced cheese. Tuck in your fresh fruit around the edges for those sweet bites. If you’ve got herbs, chop them roughly and scatter them over everything like confetti—instant upgrade. If something feels “off,” usually it just means you need a bit more color or height, so add a few more tomatoes or stack the cheese a bit taller.
Last step: taste and adjust. Grab one cracker, a bit of chicken, a veggie, and some dip and test. Too bland? Add a pinch of salt and a squeeze of lemon over the whole tray. Too dry? Another drizzle of olive oil on the protein and veggies. You’re the boss here, and you genuinely can’t fail this.
Smart Little Tweaks To Make This Work For Your Life
If you’re a planner, you can totally prep most of this in advance. Cook and shred your chicken, boil your eggs, and chop sturdier veggies (carrots, cucumbers) up to 3 days ahead—store each in its own container in the fridge. The day you serve, you’re basically just arranging things, which feels almost like art class instead of cooking.
For storage, pack leftovers in divided meal prep containers: one section for crackers, one for protein, one for veggies and fruit, and a tiny one for dip. Keep dips covered and eat within 3–4 days for best freshness. To keep crackers from getting soft, store them separately and add right before eating.
Reheating is mostly for the protein—chicken can be warmed in the microwave for 20–30 seconds, or served cold if you like it that way. Eggs and veggies are happy cold. You can easily double or triple everything for a party board; just use a bigger surface or two smaller boards side by side.
For kids, keep flavors simple, cut foods into smaller, safe sizes, and maybe offer dips on the side so they can choose. As a former teacher, I promise: giving kids “assembly power” makes them way more likely to eat it. Let them build their own mini stacks. You can do this, and they can too.
How To Serve It So Everyone Thinks You’re A Genius
This Pin on food setup is PERFECT for casual nights. Set the board in the middle of the table and let everyone build their own cracker stacks or mini “bites.” Pair it with sparkling water, iced tea, or a big pitcher of fruit‑infused water for a super light, feel‑good meal. For something heartier, add a pot of soup or a simple green salad on the side.
I love serving this for movie nights, game day spreads, or summer evenings on the patio when it’s just too hot to turn the oven on (Texas, I’m looking at you). It’s also amazing as a “clean‑out‑the‑fridge” Friday dinner—just add whatever roasted veggies, leftover grilled chicken, or extra fruit you’ve got hanging out.
Leftovers turn into the BEST little lunch boxes: layer crackers, chicken, eggs, and veggies, pack a container of dip, and you’re done. You can also chop everything up the next day and toss it over greens with a lemony yogurt dressing and call it a power salad. Please, please, please try at least one fun combo you haven’t done before—you might discover your new favorite little bite.
Common Questions About This Easy Pin On Food Board
Absolutely. Swap the chicken and eggs for chickpeas, lentils, or baked tofu, and use hummus plus a dairy‑free yogurt or tahini dip. Add extra nuts and seeds for protein, and you’ll still have a super satisfying, filling board.
You can prep all the components 1–3 days ahead, but I recommend assembling the actual board no more than 2 hours before serving so the crackers stay crisp and the veggies look their freshest. Keep it covered and chilled if it’s sitting out.
Use the formula instead of the exact list: something crunchy, a protein, at least two veggies, one fruit, and one or two dips. If you’ve got those categories covered, you’re golden, even if the details are totally different.
It can be, depending on how you build it. Lean proteins, lots of veggies, whole grain crackers, and lighter dips like Greek yogurt make it very nutrient‑dense but still fun. Just watch portions of cheese, nuts, and crackers if you’re tracking things closely.
Dry everything well after washing, and store juicy fruits away from crackers until serving time. If you’re packing leftovers, put dips and wet ingredients in small containers so they don’t leak into the crunchy stuff.
When you pull this together the first time, you’re going to be surprised by how EASY and how ridiculously delicious it is. It’s snacky, it’s pretty, it’s flexible, and it honestly makes weeknights feel a little more special than they have any right to. If you try this Pin on food style board, tell me what combos you used—drop a comment, message me on Pinterest, or tag your plate so I can cheer you on.
You can absolutely make this your own… and I really hope you do, because once you start building these, it’s kind of hard to stop…

Pin On Food Board
A customizable and colorful snack board that combines crunchy crackers, juicy veggies, shredded chicken, cheese, and delicious dips for a visually appealing and satisfying meal.
Ingredients
Base and Crunch
- 1 box Whole grain crackers or toasted pita chips
Protein
- 2 cups Cooked chicken breast, shredded or diced Rotisserie chicken is perfect.
- 4 pieces Hard-boiled eggs, halved or quartered
Veggies
- 1 cup Cherry tomatoes, whole or halved
- 1 cup Cucumber, sliced into rounds or sticks
- 1 cup Carrot sticks or baby carrots
Cheese and Dips
- 8 slices Sliced cheese (cheddar, mozzarella, etc.)
- 1 cup Hummus
- 1 cup Greek yogurt (plain or lightly salted)
Flavor Enhancers
- 2 tablespoons Olive oil
- 1 tablespoon Lemon juice
- 1 teaspoon Salt & black pepper To taste
- 1 teaspoon Garlic powder or onion powder (optional)
- 1 handful Fresh herbs like parsley or cilantro (optional) For garnish
- 1 handful A handful of nuts or seeds (almonds, pistachios, sunflower seeds)
- 1 cup Fresh fruit for sweetness (grapes, berries, apple slices)
Instructions
Preparation
- Grab a large platter, cutting board, or baking sheet lined with parchment.
- Lay out your crackers or pita chips in a loose layer.
Adding Protein
- Scatter the shredded chicken and hard-boiled eggs over the base.
- Drizzle with olive oil and sprinkle with salt if desired.
Incorporating Veggies
- Tuck cherry tomatoes, cucumber slices, and carrot sticks into empty spaces.
Creamy Elements
- Spoon hummus and Greek yogurt onto the board or serve in small bowls.
- Mix yogurt with lemon juice, olive oil, salt, pepper, and garlic powder for a quick sauce if desired.
Finishing Touches
- Sprinkle nuts or seeds over the board, add sliced cheese, and tuck in fresh fruit.
- Chop herbs and scatter over everything for decoration.
Taste Testing
- Sample the board and adjust seasoning if needed with salt or lemon juice.
Notes
You can prep most components in advance. Store leftovers in divided containers. Make it vegetarian or vegan by swapping protein sources. Adjust components based on what you have on hand.