👉 Let’s stay connected on social media!

Gordon Ramsay’s Crispy French Fries: Homemade Perfection Awaits

!
QUICK REMINDER:
While we have provided a jump to recipe button, please note that if you scroll straight to the recipe card, you may miss helpful details about ingredients, step-by-step tips, answers to common questions and helpful guidance to improve your results.
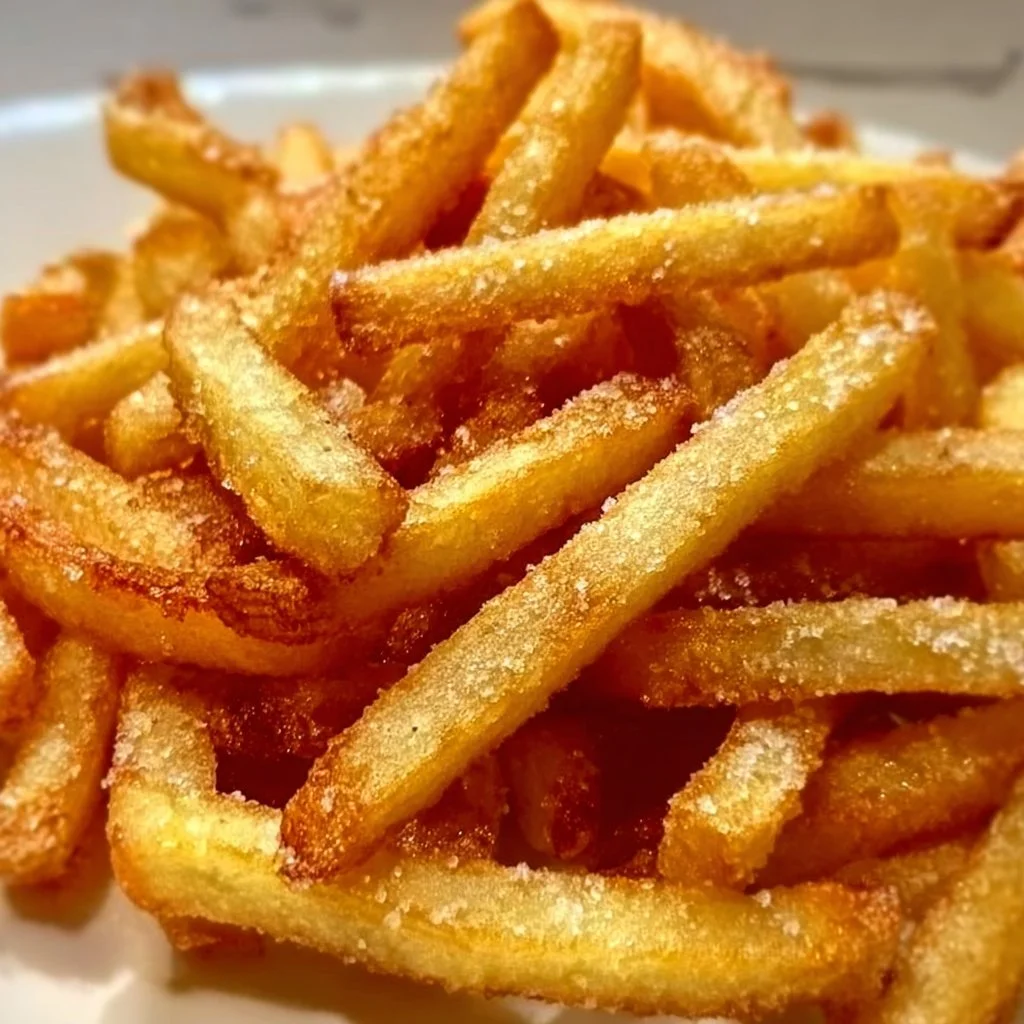
If you’ve been hunting for the perfect homemade fries, these Gordon Ramsay’s crispy French fries are about to change your kitchen life!!! These fries are golden, crunchy, fluffy, and insanely addictive—in that “I can’t believe I made this at home” kind of way. We’re talking real-deal, restaurant-style fries, not soggy, sad ones. Gordon Ramsay’s crispy French fries are everything: shatteringly crisp edges, tender centers, and that salty, can’t-stop-grabbing-another bite.
I first tried this method on a random Tuesday, fully expecting a mess, and oh my goodness—my family demolished the whole batch in minutes. No fancy gear, no chef school required, just smart steps and a tiny bit of patience. The big win? You control the oil, the salt, the portions, the whole situation, so it can absolutely fit into your balanced, real-life eating style. And once you see how easy these are, you’ll never drive out just for fries again. You really won’t.
Why These Fries Totally Deserve Your Craving
You’re going to fall for these fries because they deliver that restaurant crunch without restaurant stress, and that matters on a busy weeknight when everyone’s hungry and a little cranky and you just want a win on the table. They’re naturally vegetarian, budget-friendly, and made with simple pantry ingredients that you probably already have sitting right there in your kitchen. No weird additives, no mystery coatings, just potatoes, oil, vinegar, and salt doing magic together—simple and SO good, so so good. If you’re a meal prepper, you’ll love that you can cut and parboil them in advance, then fry right before serving. If you’re cooking for kids, these are picky-eater gold, and you can totally bake a few on the side if you want to cut back on oil one night. And if you’re a flavor-adventurer? Seasonings are wide open—paprika, garlic powder, chili, herbs, whatever makes you happy, because this recipe is more of a roadmap than a strict rule book. They’re cheap, they’re flexible, they taste like they came from a fancy bistro, and honestly, they just make you feel like a rockstar in your own kitchen!!!
What You’ll Need for Gordon-Style Crispy Fries
4 large Floury potatoes (e.g., Russet) (The best choice for a fluffy interior and crispy exterior.)
2 tablespoons White vinegar (Helps to enhance flavor and keep the fries crispier for longer.)
1 tablespoon Kosher salt (Ideal for seasoning the water.)
Oil as needed Canola or vegetable oil (A high smoke point oil for frying.)
To taste Salt for seasoning (Use to taste for that final touch of flavor.)
That’s it. I love how short this list is—like, it almost feels suspicious, but it works. Russet potatoes really are your best friend here because all that starch gives you the soft interior / crispy shell contrast we’re going for. If you can’t find Russets, any floury/baking potato will still do a pretty great job, so don’t stress. Don’t worry if your potatoes look a little different than mine, they’ll still crisp up.
White vinegar is the “wait, really?” ingredient that quietly makes everything better, helping the fries keep their structure and crunch. If you’re out, you can swap in apple cider vinegar in a pinch, but white gives the cleanest flavor. Kosher salt is ideal for seasoning your boiling water, but regular table salt works too—just use a tiny bit less because it’s finer. For oil, go with canola, vegetable, or sunflower: all neutral, all high smoke point, all perfect. I buy store-brand oil in big jugs from my local H‑E‑B here in Austin to keep this super cost-conscious, and it lasts through multiple fry nights. And for the final salt sprinkle? Use what you like. Sea salt, flaky salt, or just your everyday shaker. You truly can’t mess this up, you really can’t.
How the Magic Happens: From Potato to Crispy Perfection
Let’s walk through the process so you feel totally confident. Remember: you can do this, and if something looks weird along the way, it’s probably normal.
First up, preparation. Peel your potatoes (or leave the skin on for a rustic, slightly more fiber-y vibe—both work), then slice them into even batons, about ¼ inch thick. Think classic fast-food fry size. Try to keep them roughly the same thickness so they cook evenly; it doesn’t have to be perfect, just… close-ish. Drop the cut fries into a big bowl of cold water as you go to keep them from turning gray and to rinse off some excess starch. After 10–15 minutes, drain, then move to the stove. Bring a large pot of water to a boil, add the vinegar and kosher salt, then gently slide in the potatoes. Simmer for about 8–10 minutes, until they’re just tender on the edges but not falling apart. If one breaks, it’s okay, that happens. Drain them carefully and spread on a baking sheet to steam-dry for at least 15–20 minutes. This drying time is HUGE for crunch, so don’t rush it.
Now the first fry. Heat your oil in a deep pot or Dutch oven to around 300°F (150°C). No thermometer? Dip the end of a wooden spoon in the oil—if small bubbles form around it, you’re in the zone. Fry the potatoes in batches so they’re not crowded, about 4–5 minutes each batch, just until they look pale and softened, not golden yet. They’ll look a little sad at this point, but don’t worry, that’s exactly right. Use a slotted spoon to lift them out onto a wire rack or paper towels, and let them cool completely. You can even pause here for up to a couple of hours, or tuck them into the fridge uncovered for extra drying if you’re meal prepping.
Then comes the second fry—the crispy finale!!! Crank the oil up to about 375°F (190°C). Again, if you don’t have a thermometer, drop in one fry; it should sizzle enthusiastically right away. Fry the potatoes in small batches for 3–4 minutes, until they turn deep golden brown with beautifully crisp edges. If they’re browning too quickly, just lower the heat a bit; if they’re not coloring after a few minutes, gently turn it up. As soon as each batch comes out, hit them with salt while they’re still hot so it sticks perfectly. Listen for that little crackly sound when you tap them with the tongs—that’s your crispy confirmation.
Smart Fry Tips, Make-Ahead Hacks, and Teacher-Style Coaching
A few little tricks turn good fries into GREAT fries. First, really let those potatoes dry after boiling—moisture is the enemy of crisp, so give them time and space on the tray, and don’t stack them in a big wet pile. If you’re planning ahead, you can parboil and first-fry them earlier in the day, cool completely, then refrigerate on a tray. When dinner time hits, you’re just 3–4 minutes away from hot, golden fries. It feels like cheating, but it’s just smart prep.
For storage, leftover fries (if you somehow have them) can go into an airtight container once they’re fully cooled. They’re best within 1–2 days. To reheat, skip the microwave—it makes them sad and soft. Instead, pop them into a 400°F (200°C) oven or air fryer for about 5–8 minutes, and they bounce back surprisingly well. If you’re feeding a crowd, fry in batches and keep finished fries on a wire rack set over a baking sheet in a 250°F (120°C) oven while you finish the rest so everyone gets hot, crisp fries together.
For kids, you can cut the fries a little thicker so they’re extra fluffy inside and easier for little hands to grab. Maybe go light on the salt and set out dips—ketchup, Greek yogurt ranch, barbecue sauce—for a DIY fry bar. And as your friendly ex-teacher here, I’m telling you: read through the steps once before you start, set out everything you need, and then just follow it like a mini science experiment. You’ve absolutely got this, and yes, you can totally pull off “Gordon Ramsay fries” on a Tuesday.
How to Serve Your Crispy French Fries Like a Pro
These fries go with pretty much everything: burgers, grilled chicken, baked fish, veggie burgers, or just a big salad if you’re balancing things out a bit today. I love piling them into a parchment-lined bowl or a little basket so they feel restaurant-special, even if we’re eating in leggings on the couch. For sauce, think beyond ketchup (even though ketchup is classic and perfect): garlicky aioli, spicy mayo, yogurt dip with herbs, or even a sprinkle of your favorite seasoning blend right after frying.
They’re amazing at backyard cookouts, game days, birthday parties, or “we survived this week” celebrations. At my house, we’ll sometimes turn them into loaded fries with cheese, green onions, and a dollop of Greek yogurt for a slightly lighter spin on the classic. Leftovers can get a second life tossed into a breakfast skillet with eggs and veggies, or chopped over a salad for a fun crunchy topping. Honestly, once you taste how crisp and fluffy these are, you’re going to look for excuses to make them again, you really really are.
Fries FAQ: Your Crispiest Questions, Answered
Yes, totally. Use the wooden spoon trick: dip the end into the oil—gentle bubbles means the oil is ready for the first fry, more energetic bubbles for the second fry. You’ll also learn to read the fries themselves: they should sizzle steadily, not violently, and turn golden in a few minutes.
I highly recommend it. The vinegar helps the potatoes hold their shape and encourages that crisp exterior. The fries won’t taste vinegary at all, it just quietly does its job in the background. If you skip it, they can still be good, just a little less structured and a touch less crisp.
You can. They won’t be quite as Gordon-level crispy, but still tasty. Parboil with vinegar and salt as written, dry very well, then toss with a light coating of oil and bake at 425°F (220°C), flipping once, until golden and crisp at the edges.
If you don’t have a fry cutter, just slice the potato into ¼-inch planks, stack a few, then cut into strips. It doesn’t have to be perfect—close enough is fine. Take your time on the first potato, then your hands remember the motion and it goes faster.
Absolutely. Just make sure you fry in batches so you don’t crowd the pot. Overcrowding drops the oil temp and gives you limp fries. Keep finished fries warm on a rack in a low oven while you work through the rest.
And there you go—Gordon Ramsay’s crispy French fries, made in your own kitchen, with your own two hands, and honestly they’re so easy and so delicious you might start planning meals around the fries instead of the other way around. If you try them, tell me how it went, what you served them with, and what dips you used—I love hearing your tweaks and seeing your photos on Instagram and Pinterest. Tag me so I can cheer you on, because you really can do this, and once you nail it the first time, you’ll be hooked…
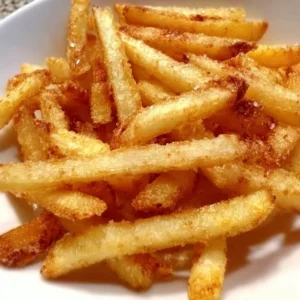
Crispy French Fries
These homemade fries are golden, crunchy, fluffy, and irresistibly addictive, resembling restaurant-style fries made with simple ingredients.
Ingredients
Main Ingredients
- 4 large Floury potatoes (e.g., Russet) Ideal for a fluffy interior and crispy exterior.
- 2 tablespoons White vinegar Enhances flavor and keeps fries crispier.
- 1 tablespoon Kosher salt Best for seasoning boiling water.
- as needed Oil (Canola or vegetable oil) High smoke point oil for frying.
- to taste salt Salt for seasoning Use to taste for the final touch.
Instructions
Preparation
- Peel the potatoes or leave the skin on and slice them into even batons, about ¼ inch thick.
- Drop the cut fries into a bowl of cold water to prevent browning and remove excess starch for 10–15 minutes.
- Drain and boil a large pot of water, adding vinegar and kosher salt.
- Simmer the potatoes for 8–10 minutes until just tender, then drain and spread them out on a baking sheet to steam-dry for at least 15–20 minutes.
First Fry
- Heat oil in a deep pot to about 300°F (150°C).
- Fry the potatoes in batches for 4–5 minutes until pale and softened, then lift them out and let cool completely.
Second Fry
- Raise the oil temperature to about 375°F (190°C).
- Fry the potatoes in small batches for 3–4 minutes until deep golden brown and crisp, seasoning with salt immediately after frying.
Notes
Let potatoes dry fully after boiling for maximum crispiness. For storage, place leftover fries in an airtight container. Reheat in a 400°F oven or air fryer to retain crispness. For kids, cut fries thicker and serve with dips.