👉 Let’s stay connected on social media!

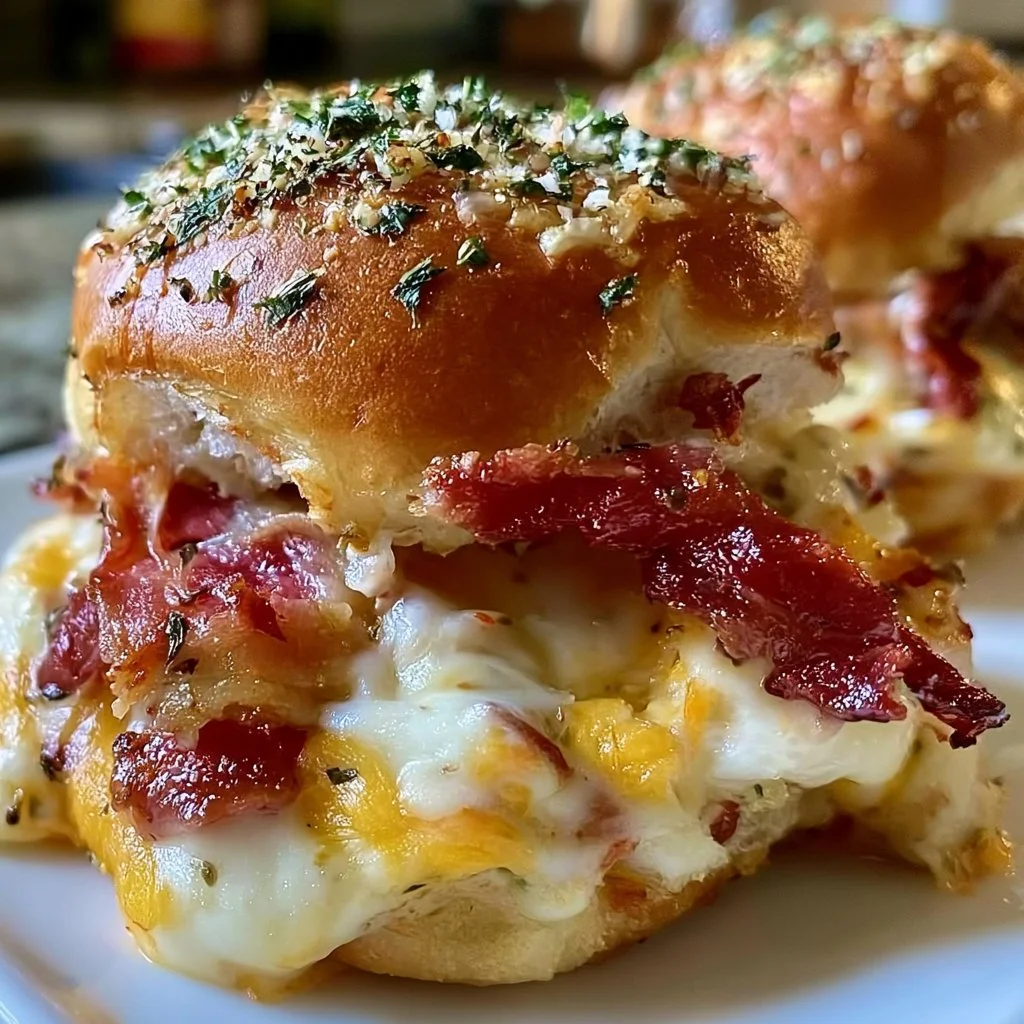
Irresistibly Cheesy Baked Italian Grinder Sliders Delight

!
QUICK REMINDER:
While we have provided a jump to recipe button, please note that if you scroll straight to the recipe card, you may miss helpful details about ingredients, step-by-step tips, answers to common questions and helpful guidance to improve your results.
If you’re craving cheesy baked sliders that taste like your favorite Italian grinder sandwich, these Irresistibly Cheesy Baked Italian Grinder Sliders Delight will absolutely rock your weeknight dinner, your game day spread, AND your meal prep plan. These little baked Italian sliders are melty, buttery, tangy, and so ridiculously satisfying, you’ll be thinking about the next batch before you finish the first. I’m not kidding, they’re that good, they’re just THAT GOOD.
I stumbled into this recipe on a chaotic Tuesday in Austin when I needed something fast, fun, and family‑friendly that didn’t feel like another boring sandwich night. I took all my favorite Italian grinder flavors, tucked them into Hawaiian rolls, baked them under a garlicky butter topping, and… life changed a little. These Irresistibly Cheesy Baked Italian Grinder Sliders Delight are easy to assemble, easy to bake, easy to eat. They’re perfect for meal preppers, football fans, and honestly anyone who loves cheesy things that pull apart.
You get soft, sweet rolls, layers of savory deli meat, melty provolone, a bright grinder-style mayo spread, and a golden garlicky top that smells like a cozy Italian deli. They’re budget‑friendly, customizable, freezer-friendly, and they reheat beautifully. And the best part? You can absolutely make them yours. Less cheese? More cheese? Extra peppers? Whole-wheat rolls? You can do this, and you can do it your way!!!
Why These Sliders Will Steal Your Heart (and Dinner Plans)
These little Italian grinder sliders are the kind of recipe that makes everybody at the table happy, from picky kids to spice-lovers to the “is there enough protein?” person. They’re irresistibly cheesy, they’re delightfully buttery, and they pack all those Italian sub vibes in one pan. The sweet rolls play so nicely with the tangy seasoned mayo and banana peppers, and that contrast is what makes them taste like A LOT of effort… when honestly, it’s mostly assembly.
You’ll love that they’re a total crowd-pleaser for game days, potlucks, and movie nights, but they also slide right into your Sunday meal prep. Make a pan, cool them, portion them, and boom—grab-and-go lunches all week. They’re also very forgiving: if you’re watching sodium, you can use lower-salt deli meats and cheese; if you’re counting calories, you can go lighter on the butter and mayo and still get all the flavor. Vegetarian family member? Swap in grilled veggies and skip the meat. These sliders are flexible, they’re friendly, and they’re here to make your life easier, easier, easier.
And if you’re the kind of cook who worries, “Will mine look as good as the photos?” the answer is YES. The oven does the work, the cheese does the magic, and the butter glaze makes it look restaurant-level fancy with almost no effort. This recipe really does have your back.
What You Need for These Dreamy Italian Sliders
- 1 package Hawaiian sweet rolls (12 count)
- 0.5 cup mayonnaise
- 1 tbsp red wine vinegar
- 1 tsp Italian seasoning
- 0.5 lb deli turkey (thinly sliced, to replace ham)
- 0.5 lb beef salami (Italian-style, pork-free)
- 0.25 lb turkey pepperoni (pork-free)
- 10 slices provolone cheese
- 0.5 cup banana peppers, drained
- 0.5 cup unsalted butter, melted
- 1 tsp garlic powder
- 1 tbsp dried parsley
- 1 tbsp parmesan cheese, grated
Let’s talk about the fun pieces. Hawaiian sweet rolls are such a dream here—soft, just a little sweet, and they bake up golden. If you need something lighter, whole wheat slider rolls work great, too. The grinder-style mayo (mayo + red wine vinegar + Italian seasoning) adds that tangy, deli-shop flavor and keeps everything juicy.
For the meats, I’m using turkey instead of ham, plus beef salami and turkey pepperoni to keep things pork-free while still giving you those nostalgic Italian grinder vibes. Can’t find one of them? Use whatever deli turkey, chicken, or beef slices you love. Want to go lighter? Use reduced-fat provolone or even part-skim mozzarella. Banana peppers bring a mild, bright kick and a bit of vitamin C, but you can swap in pickled jalapeños or skip them for kiddo palates.
I usually grab most of this at my regular grocery store in Austin—nothing fancy, all pretty affordable. Buying the rolls and cheese on sale is a sneaky way to keep costs down. And please, treat this ingredient list as a friendly guide, not a rigid law. Make it easy. Make it delicious. Make it yours.
How to Make Them: Simple, Cheesy, and Totally Doable
First, get your oven preheating to 350°F (175°C) and lightly grease a 9×13 baking dish. This takes 2 minutes and sets you up for success later with easy cleanup. If your pan is a little smaller, don’t panic, the rolls will just be snug and cozy.
Next, take the whole sheet of Hawaiian rolls out of the package and, keeping them together, slice them in half horizontally so you have a top “slab” and a bottom “slab.” It doesn’t have to be perfect. If a few rolls separate, just nudge them back together in the pan. You’re good.
In a small bowl, whisk together the mayonnaise, red wine vinegar, and Italian seasoning. This is your grinder-style sauce. Spread it evenly over the cut side of the bottom rolls. If you’re worrying, “Did I use enough?”—if you see a light, even layer, you’re golden. Too much can make it soggy, so just aim for a nice swipe.
Now for the fun stacking part: layer the turkey, then the beef salami, then the turkey pepperoni over the sauced rolls. Try to cover all the edges so every slider feels stuffed and special. If the meat hangs over, that’s fine; it shrinks a bit in the oven.
Lay the provolone slices across the top of the meat in a single layer, overlapping as needed. Then scatter the drained banana peppers on top. This is where the grinder magic really happens—the tangy peppers cut through the richness and give you that sandwich-shop zing. Don’t love peppers? Use less. Love them too much? Use more!
Place the top slab of rolls over the filling. Gently press down so everything snuggles together.
In another small bowl, whisk the melted butter with garlic powder, dried parsley, and grated parmesan. This is your flavor crown. Brush it generously over the tops of the rolls, letting it drip into the cracks just a bit. If you don’t have a brush, a spoon works, it’s all good.
Cover the dish tightly with foil and bake for about 15 minutes. This first bake melts the cheese and warms everything through without over-browning. Then remove the foil and bake for another 5–10 minutes, until the tops are deeply golden and your kitchen smells like an Italian bakery married a pizzeria. If the tops seem to brown too fast, just tent the foil back on loosely.
Let the sliders rest 5 minutes before slicing so the cheese can settle slightly and not run everywhere. Then cut along the roll lines with a sharp knife or even a pizza cutter. Don’t worry if some cheese escapes. That’s bonus snack cheese.
Smart Tips to Make These Sliders Work for You
If you love to meal prep, you can assemble the sliders up to a day ahead, cover them tightly, and refrigerate. When you’re ready to bake, let them sit at room temp for about 15 minutes, then add the butter topping and bake as directed. For freezer prep, assemble, skip the butter topping for now, wrap well, and freeze; thaw overnight, add the topping, and bake.
Leftovers? Store cooled sliders in an airtight container in the fridge for up to 3 days. To reheat, use the oven or air fryer at 325°F so they crisp back up—about 8–10 minutes. The microwave works in a pinch, but they’ll be softer.
To batch cook for a party, just double the recipe and use two pans side by side. It’s exactly the same process, just more deliciousness. For kids, you can leave off the banana peppers on half the tray, use milder turkey only, or cut the baked sliders smaller for little hands. Think of this as a mix-and-match teaching moment in your own kitchen—you’re in charge, and you’re doing great.
How to Serve Your Irresistibly Cheesy Sliders
These Italian grinder sliders are perfect as a main dish with a big green salad, simple roasted veggies, or a bowl of tomato soup. For parties or game day, I love to pile them on a wooden board with a little bowl of marinara for dipping, some raw veggies, and maybe a quick Italian-style pasta salad on the side. It feels special without feeling fussy.
They’re also fantastic in lunchboxes: wrap a cooled slider in foil, add some sliced cucumbers and fruit, and you suddenly have this fun, hearty lunch that doesn’t feel like the same old sandwich. Leftovers can be diced up and turned into a cheesy Italian “stuffing” over a salad or thrown into an egg scramble the next morning (yes, breakfast sliders energy

Italian Grinder Sliders
These cheesy baked sliders are packed with Italian flavors, featuring layers of savory deli meat, melty provolone cheese, and a tangy mayo spread, all nestled in soft Hawaiian rolls.
Ingredients
For the sliders
- 1 package Hawaiian sweet rolls (12 count) Soft and slightly sweet rolls
- 0.5 cup mayonnaise For the grinder-style sauce
- 1 tbsp red wine vinegar Adds tang to the mayo
- 1 tsp Italian seasoning Enhances flavor
- 0.5 lb deli turkey (thinly sliced) To replace ham, for a pork-free option
- 0.5 lb Italian-style beef salami (pork-free) Adds rich flavor
- 0.25 lb turkey pepperoni (pork-free) For a spicy kick
- 10 slices provolone cheese For that melty texture
- 0.5 cup banana peppers, drained Optional for added tanginess
- 0.5 cup unsalted butter, melted For brushing the rolls
- 1 tsp garlic powder Adds flavor to the butter topping
- 1 tbsp dried parsley For garnish
- 1 tbsp parmesan cheese, grated Enhances bottom layer flavor
Instructions
Preparation
- Preheat your oven to 350°F (175°C) and lightly grease a 9x13 baking dish.
- Slice the Hawaiian rolls in half horizontally to create a top and bottom slab.
- In a small bowl, whisk together mayonnaise, red wine vinegar, and Italian seasoning. Spread evenly over the cut side of the bottom rolls.
Layering
- Layer the turkey, beef salami, and turkey pepperoni over the sauced rolls.
- Lay provolone slices over the meat and scatter banana peppers on top.
- Place the top slab of rolls over the filling and gently press down.
Baking
- In another bowl, whisk melted butter with garlic powder, dried parsley, and grated parmesan. Brush generously over the tops of the rolls.
- Cover the dish tightly with foil and bake for about 15 minutes.
- Remove the foil and bake for another 5–10 minutes, until the tops are golden.
Serving
- Let the sliders rest for 5 minutes before slicing. Cut along the roll lines and serve.
Notes
You can assemble the sliders up to a day ahead, cover them tightly, and refrigerate. For freezer prep, assemble and freeze without the butter topping. Thaw overnight before baking.